在本程式碼研究室中,您要為 Inventory app 新增更多功能,並學習如何使用 Room 讀取、顯示、更新及刪除 SQLite database 中的 data。使用 RecyclerView 顯示 database 中的 data,並在 database 中的基礎資料(underlying data) 發生變更時自動更新 data 。
學習目標
如何讀取及顯示 SQLite database 中的 entities 。
如何使用 Room library 更新和刪除 SQLite database 中的 entities 。
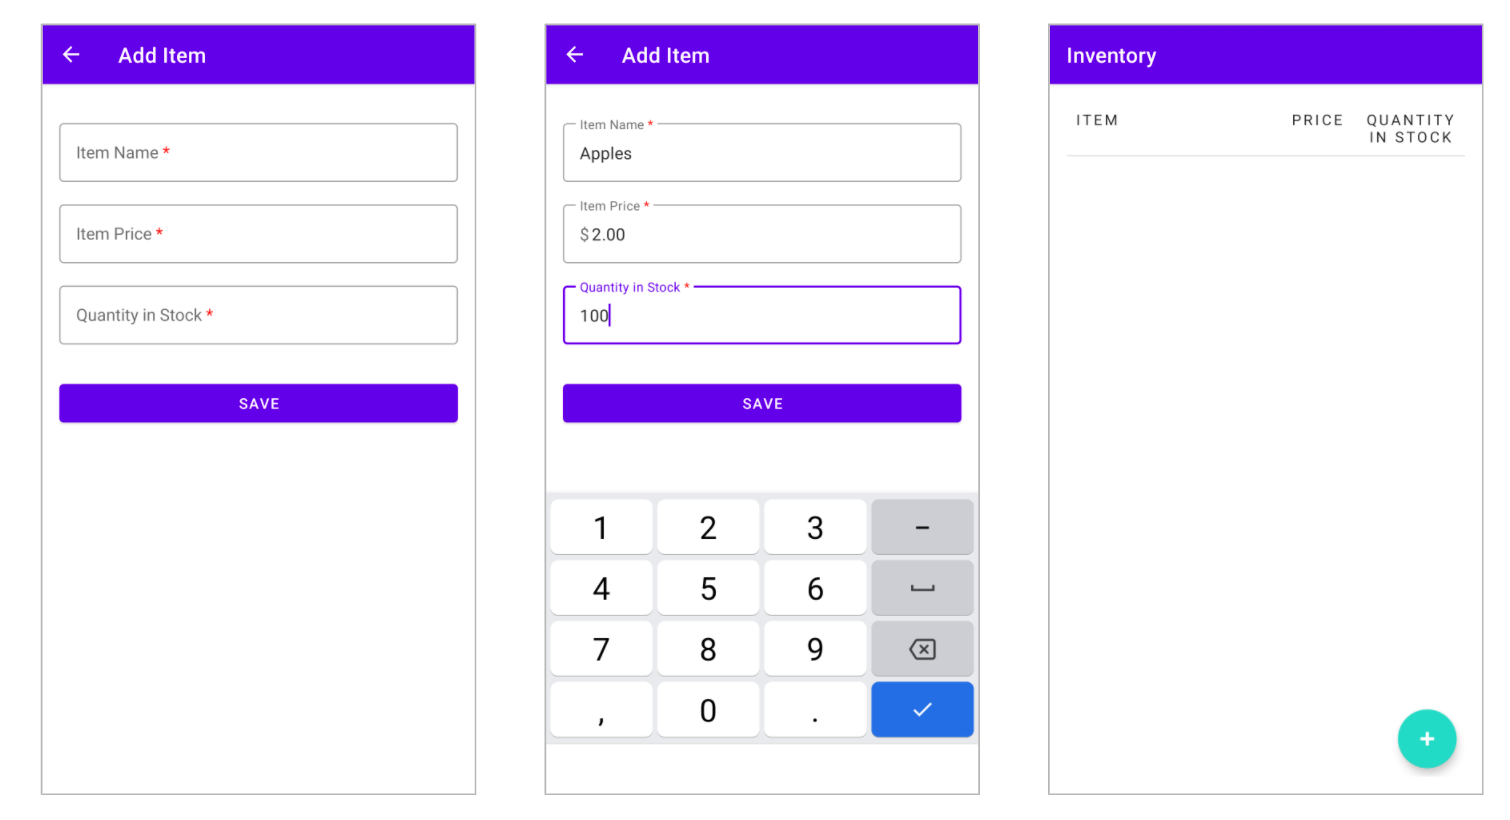
Starter app overview 本程式碼研究室會使用先前程式碼研究室的 Inventory app solution code,做為範例程式碼。範例 app 已使用 Room persistence library 儲存 data。使用者可以透過「Add Item」畫面,將 data 新增至 app database。
注意:目前版本的範例 app 不會顯示 database 中儲存的日期(date)。
在本程式碼研究室中,您將擴充 app,使其使用 Room library 讀取及顯示 database 中的 data ,以及更新及刪除 database 中的 entities 。
下載範例程式碼 這個範例程式碼與先前程式碼研究室的 solution code 相同。
新增 RecyclerView 在這項工作中,您要在 app 中新增 RecyclerView,以顯示 database 中儲存的 data。
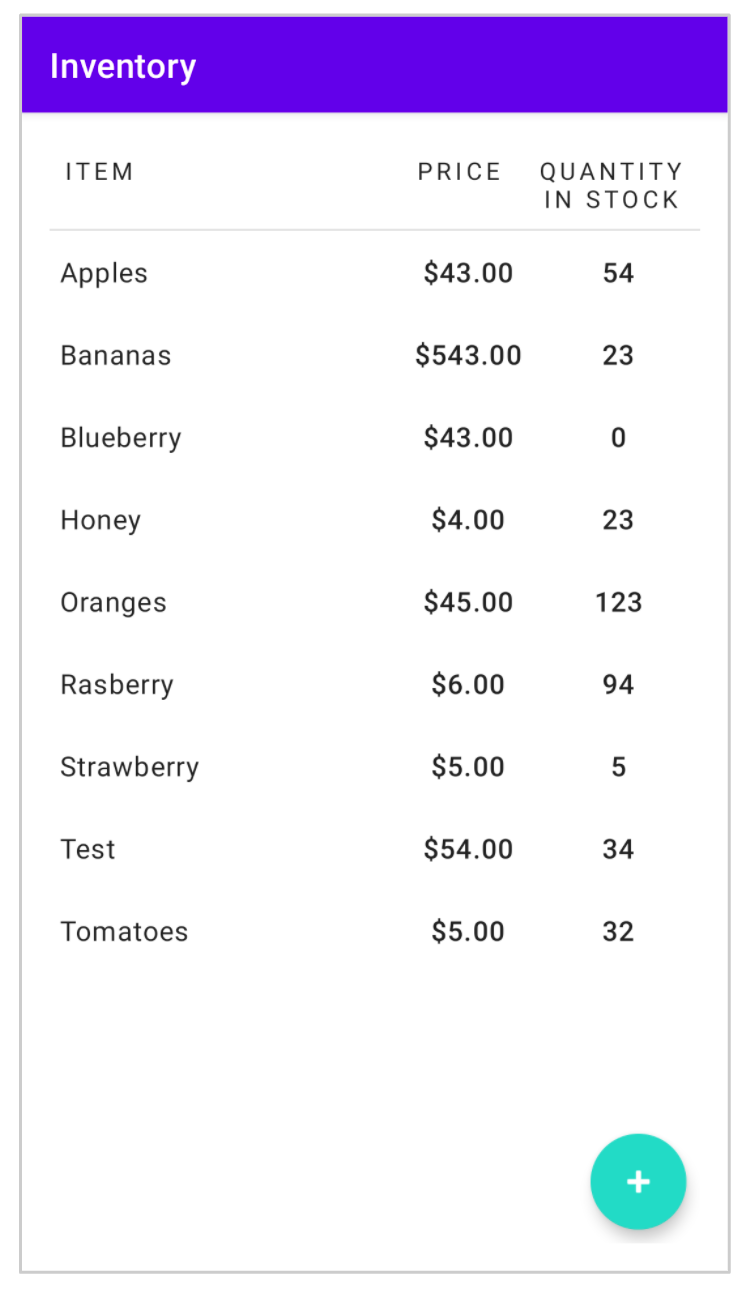
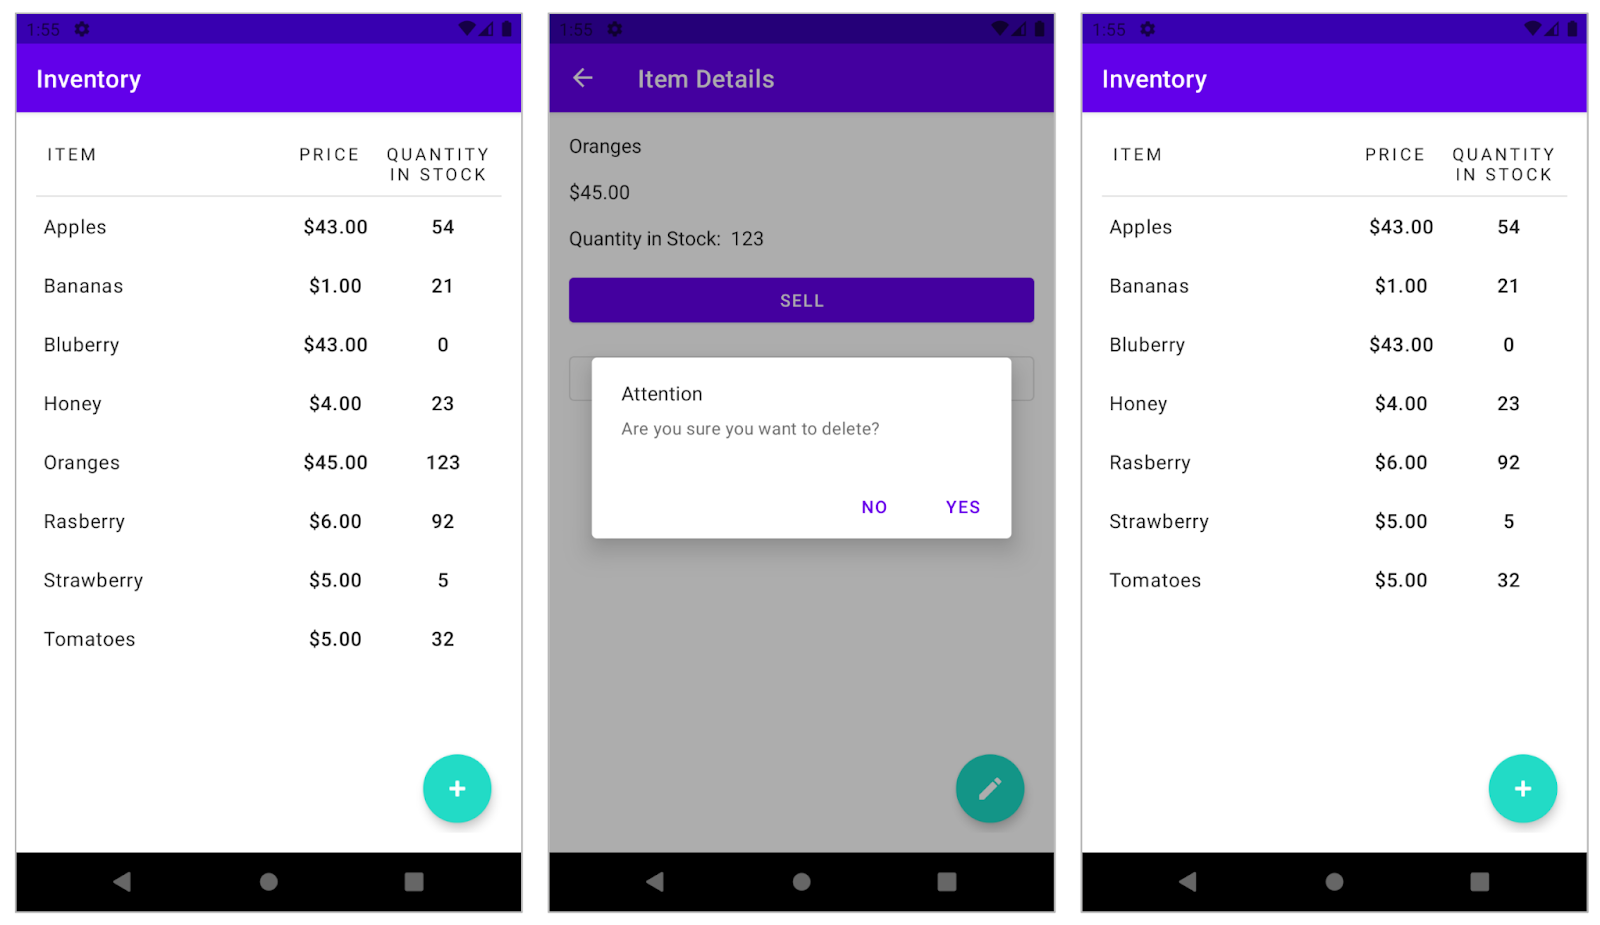
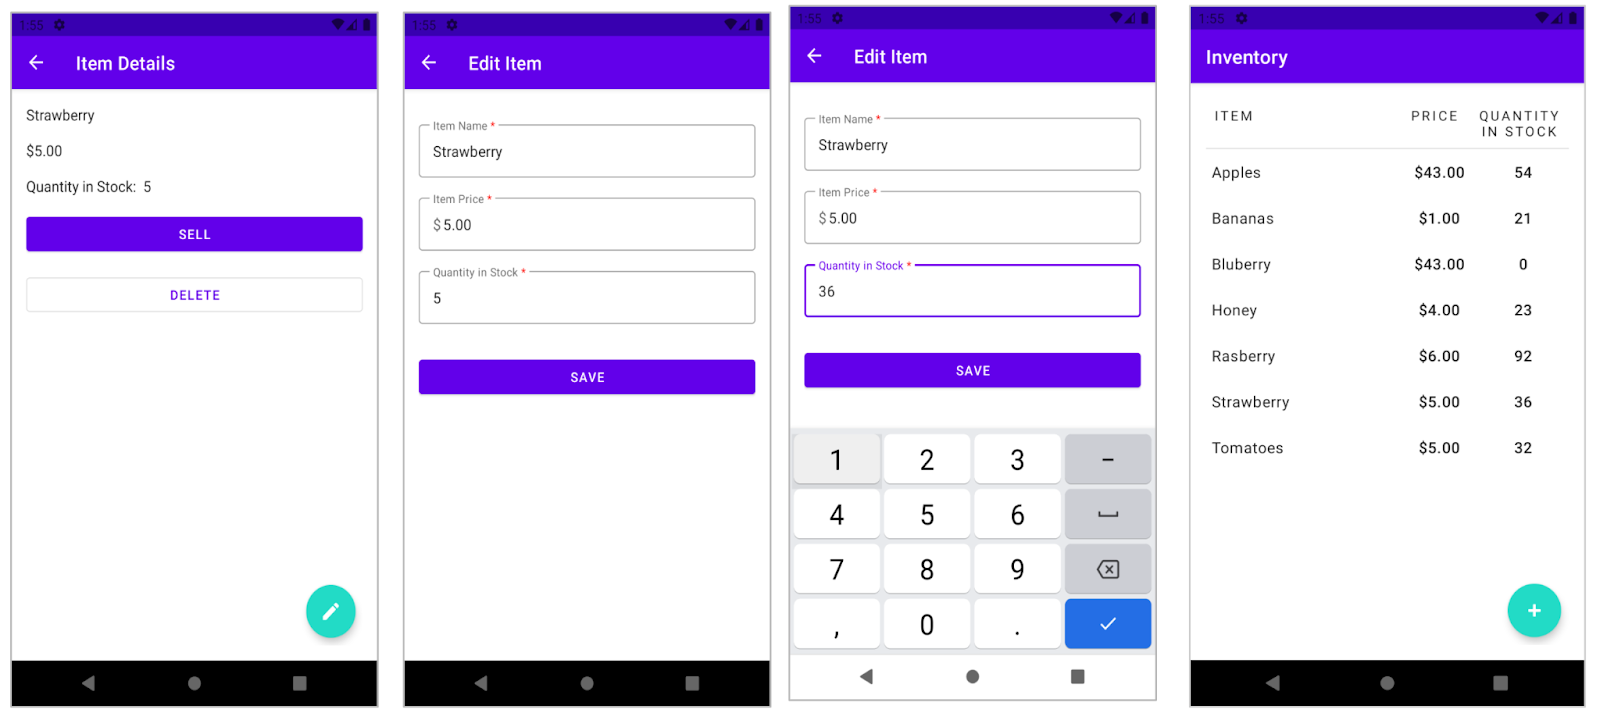
以下是最終 app 的螢幕截圖。
請注意,price 會以貨幣格式(currency format) 顯示。如要將 double value 轉換成所需的貨幣格式(currency format) ,請在 Item class 中加入 extension function 。
Extension Functions Kotlin 能夠使用新功能擴充(extend) class ,無需沿用 class 或修改 class 的現有定義。這表示您可以將 functions 加入現有 class,而無需存取其原始碼。方法是透過名為擴充功能 的特殊宣告來執行。
舉例來說,您可以在無法修改的第三方 library 中,為某個 class 編寫新的 functions 。這類 functions 可以照常呼叫,就像是原始 class 的方法一樣。這些 functions 稱為 extension function 。(您也可以使用 extension properties(擴充屬性) 為現有 class 定義新屬性)。
Extension function 實際上不會修改 class ,但可以讓您在呼叫該 class objects 的 function 時 使用點號標記法( . ) 。
例如,在下列程式碼中,有一個名為 Square 的 class。此 class 內會有正方形四邊的屬性 side ,以及計算正方形面積的 function area() 。請注意,Square.perimeter() extension function 的 function name 開頭 是其使用的 class 可以引用 Square class 的 public 屬性( side ) 。
查看 main() function 中的 extension function 使用方式。建立的 extension function perimeter() 會在該 Square class 中做為一般 function 呼叫。
範例:
1
2
3
4
5
6
7
8
9
10
11
12
13
14
15
16
17
18
19
class Square (val side: Double ){ fun area () Double { return side * side; } } fun Square.perimeter () Double { return 4 * side; } fun main (args: Array <String >) val square = Square(5.5 ); val perimeterValue = square.perimeter() println("Perimeter: $perimeterValue " ) val areaValue = square.area() println("Area: $areaValue " ) }
在這個步驟中,您要將 item price 轉換為貨幣格式(currency format) string 。一般而言,建議您不要只是為了設定 data 格式而去變更代表 data 的 entity class (請參見單一責任原則 ),您可改為新增 extension function 。
在 Item.kt 的 class 定義下方,新增名為 Item.getFormattedPrice() 的 extension function,該 function 不使用參數並且會 return String。請注意 function 名稱中的 class name 和點號( . )標記 。
1
2
fun Item.getFormattedPrice () NumberFormat.getCurrencyInstance().format(itemPrice)
import java.text.NumberFormat。
或者:
1 2 3 4 5 fun Item.getFormatPrice () return NumberFormat.getCurrencyInstance().format(itemPrice) }
新增 ListAdapter 在這個步驟中,您要在 RecyclerView 中新增 list adapter 。鑒於您熟悉了之前程式碼研究室中有關實作 adapter 的內容,操作說明匯總如下。為了方便起見,這個步驟最後提供了完整的 ItemListAdapter 檔案,可協助您瞭解程式碼研究室中的 Room 概念。
在 com.example.inventory package 中,新增名為 ItemListAdapter 的 Kotlin class。傳入名為 onItemClicked() 的 function 做為 constructor 參數,並將 Item object 做為參數使用。
變更 ItemListAdapter class signature 來繼承(extend) ListAdapter。傳入 Item 和 ItemListAdapter.ItemViewHolder 做為參數。
新增 constructor 參數 DiffCallback;ListAdapter 會使用這項參數來偵測 list 中的變更內容 。
覆寫必要的方法 onCreateViewHolder() 和 onBindViewHolder()。
onCreateViewHolder() 方法會在 RecyclerView 需要時 return 新的 ViewHolder。在 onCreateViewHolder() 方法中,建立一個新的 View,並>使用自動產生的 binding class ItemListItemBinding 從 item_list_item.xml layout 檔案加載它。
實作 onBindViewHolder() 方法。使用 getItem() 方法取得 current item ,並傳遞 position 。
在 itemView 上設定 click listener ,在 listener 中呼叫 function onItemClicked()。
定義 ItemViewHolder class,並從 RecyclerView.ViewHolder 繼承該 class。覆寫 bind() function,並傳入 Item object。
定義 companion object 。在 companion object 中,定義 type 為 DiffUtil.ItemCallback<Item>() 且名稱為 DiffCallback 的 val。覆寫必要的方法 areItemsTheSame() 和 areContentsTheSame(),然後加以定義。
完成的 class 應如下所示:
1
2
3
4
5
6
7
8
9
10
11
12
13
14
15
16
17
18
19
20
21
22
23
24
25
26
27
28
29
30
31
32
33
34
35
36
37
38
39
40
41
42
43
44
45
46
47
48
49
50
51
52
53
54
55
56
package com.example.inventoryimport android.view.LayoutInflaterimport android.view.ViewGroupimport androidx.recyclerview.widget.DiffUtilimport androidx.recyclerview.widget.ListAdapterimport androidx.recyclerview.widget.RecyclerViewimport com.example.inventory.data .Itemimport com.example.inventory.data .getFormattedPriceimport com.example.inventory.databinding.ItemListItemBindingclass ItemListAdapter (private val onItemClicked: (Item) -> Unit ) : ListAdapter<Item, ItemListAdapter.ItemViewHolder>(DiffCallback) { override fun onCreateViewHolder (parent: ViewGroup , viewType: Int ) return ItemViewHolder( ItemListItemBinding.inflate( LayoutInflater.from( parent.context ) ) ) } override fun onBindViewHolder (holder: ItemViewHolder , position: Int ) val current = getItem(position) holder.itemView.setOnClickListener { onItemClicked(current) } holder.bind(current) } class ItemViewHolder (private var binding: ItemListItemBinding) : RecyclerView.ViewHolder(binding.root) { fun bind (item: Item ) } } companion object { private val DiffCallback = object : DiffUtil.ItemCallback<Item>() { override fun areItemsTheSame (oldItem: Item , newItem: Item ) Boolean { return oldItem === newItem } override fun areContentsTheSame (oldItem: Item , newItem: Item ) Boolean { return oldItem.itemName == newItem.itemName } } } }
在 ItemViewHolder class 中實作 bind() function。將 itemName TextView bind 至 item.itemName。使用 getFormattedPrice() extension function 以貨幣格式(currency format)取得 price,並將其 bind 至 itemPrice TextView。將 quantityInStock 值轉換為 String,並將其 bind 至 itemQuantity TextView。已完成的方法應如下所示:
1
2
3
4
5
6
7
fun bind (item: Item ) binding.apply { itemName.text = item.itemName itemPrice.text = item.getFormattedPrice() itemQuantity.text = item.quantityInStock.toString() } }
import com.example.inventory.data.getFormattedPrice。
從完成的 app 查看 inventory list 畫面。請注意,每個 list element 都會顯示 inventory item 的 name 、以貨幣格式(currency format)顯示的 price ,以及 current stock 。在先前的步驟中,您使用了 item_list_item.xml layout 檔案和三個 TextView 來建立 rows。在下一個步驟中,您要將 entity 的詳細資料(details) bind 至這些 TextView。
使用 ListAdapter 在這項工作中,您要更新 InventoryViewModel 和 ItemListFragment,以便使用您在上一個步驟中建立的 list adapter ,在畫面中顯示 item 詳細資料(details)。
在 InventoryViewModel class 的開頭,針對 database 中的 item ,建立一個名為 allItems 且 type 為 LiveData<List<Item>> 的 val。如果出現錯誤,別擔心,您將很快進行修正。
1 val allItems: LiveData<List<Item>>
import androidx.lifecycle.LiveData。
在 itemDao 上呼叫 getItems(),並指派給 allItems。getItems() function 會 return Flow。如要以 LiveData 值的形式使用 data,請使用 asLiveData() function。已完成的定義應如下所示:
1 val allItems: LiveData<List<Item>> = itemDao.getItems().asLiveData()
import androidx.lifecycle.asLiveData。
在 ItemListFragment 中,請於 class 開頭宣告一個 type 為 InventoryViewModel 的 private 不可變屬性 viewModel。使用 by 委派,將屬性初始化作業傳送至 activityViewModels class。傳入 InventoryViewModelFactory constructor。
1
2
3
4
5
private val viewModel: InventoryViewModel by activityViewModels { InventoryViewModelFactory( (activity?.application as InventoryApplication).database.itemDao() ) }
import androidx.fragment.app.activityViewModels。
同樣在 ItemListFragment 中,捲動至 function onViewCreated()。在 super.onViewCreated() 呼叫下方,宣告名為 adapter 的 val。使用預設 constructor 初始化新的 adapter 屬性,ItemListAdapter{} 不會傳入任何內容。
將新建立的 adapter bind 至 recyclerView,如下所示:
1
2
3
val adapter = ItemListAdapter {} binding.recyclerView.adapter = adapter
設定 adapter 後,仍位於 onViewCreated() 內。在 allItems 上附加 observer ,監聽 data 變更 。
在 observer 內,對 adapter 呼叫 submitList(),並傳遞新的 list。此操作會使用 list 中的新 item 更新 RecyclerView。
1 2 3 4 5 viewModel.allItems.observe(this .viewLifecycleOwner) { items -> items.let { adapter.submitList(it) } }
確認已完成的 onViewCreated() 方法如下所示。執行 app。請注意,如果您將 item 儲存在 app database 中,則系統會顯示 inventory list。如果 list 為 empty,請新增部分 inventory items 至 app database。
1
2
3
4
5
6
7
8
9
10
11
12
13
14
15
16
17
18
19
override fun onViewCreated (view: View , savedInstanceState: Bundle ?) super .onViewCreated(view, savedInstanceState) val adapter = ItemListAdapter { } binding.recyclerView.adapter = adapter viewModel.allItems.observe(this .viewLifecycleOwner) { items -> items.let { adapter.submitList(it) } } binding.recyclerView.layoutManager = LinearLayoutManager(this .context) binding.floatingActionButton.setOnClickListener { val action = ItemListFragmentDirections.actionItemListFragmentToAddItemFragment( getString(R.string.add_fragment_title) ) this .findNavController().navigate(action) } }
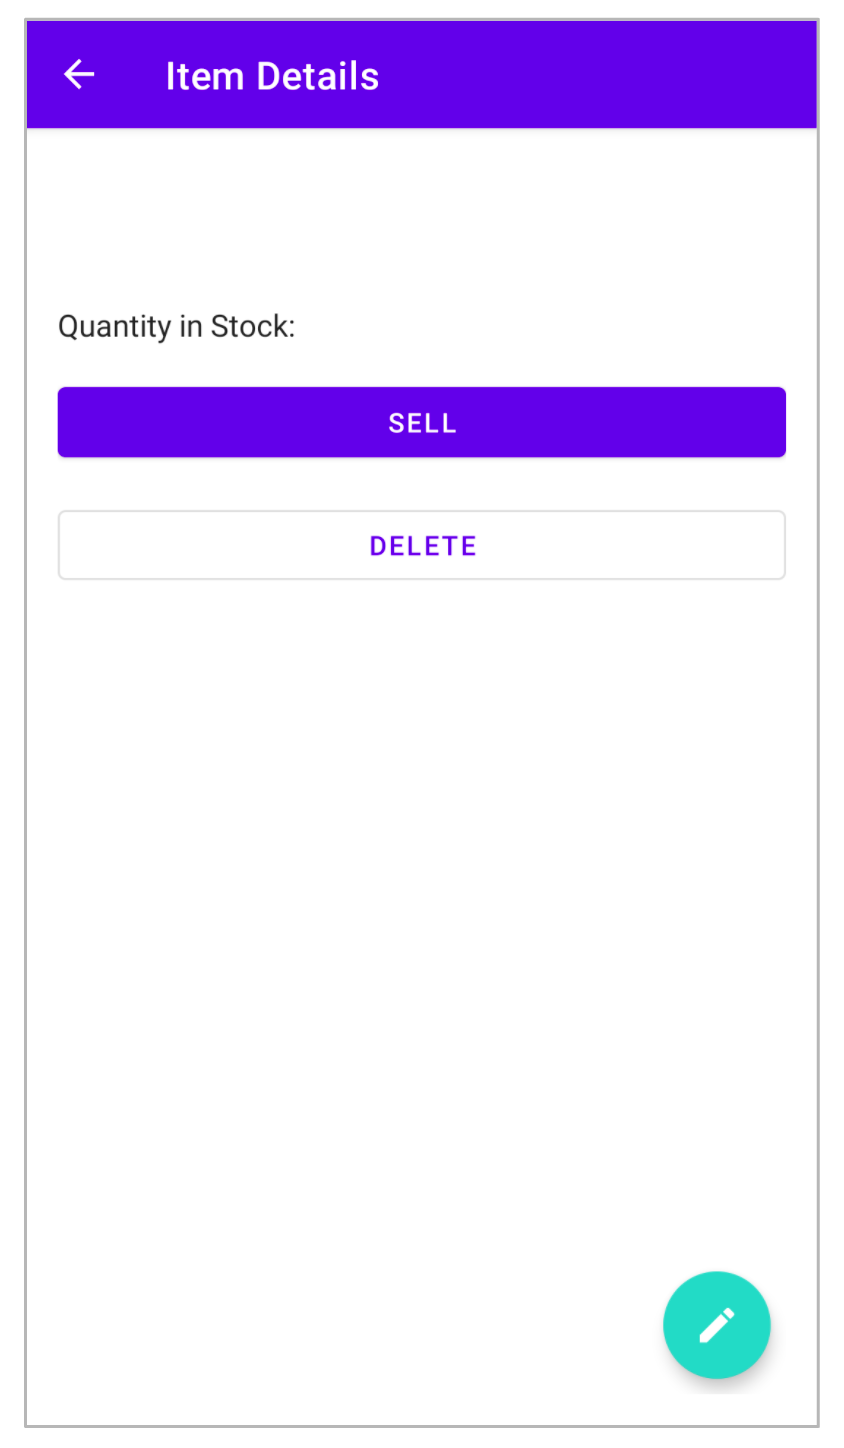
顯示 item details 在這項工作中,您將在「Item Details」畫面中讀取並顯示 entity details 。您要使用 primary key (也就是 item id ) 來從 inventory app database 中讀取 details (例如 name、price 和 quantity ),並使用 fragment_item_detail.xml layout 檔案將這些 details 顯示在「Item Details」畫面上。我們已預先為您設計好 layout 檔案 (fragment_item_detail.xml),當中包含三個用來顯示 item details 的 TextView。
在這項工作中,您將執行下列步驟:
在 RecyclerView 中新增 click handler ,將 app 移至「Item Details」畫面。
在 ItemListFragment fragment 中,從 database 擷取並顯示 data。
將 TextView bind 至 ViewModel data。
新增 click handler
在 ItemListFragment 中,捲動至 onViewCreated() function,即可更新 adapter 定義。
將 lambda 新增為 ItemListAdapter{} 的 constructor 參數。
1
2
val adapter = ItemListAdapter {}
在 lambda 中,建立名為 action 的 val。您很快便要修正初始化錯誤。
1
2
3
val adapter = ItemListAdapter { val action }
對 ItemListFragmentDirections 呼叫 actionItemListFragmentToItemDetailFragment() 方法,傳入 item id。將 return 的 NavDirections object 指派給 action。
1
2
3
val adapter = ItemListAdapter { val action = ItemListFragmentDirections.actionItemListFragmentToItemDetailFragment(it.id) }
在 action 定義下方,使用 this.findNavController() 擷取 NavController instance,然後對其呼叫 navigate(),傳入 action。Adapter 的定義如下所示:
1
2
3
4
val adapter = ItemListAdapter { val action = ItemListFragmentDirections.actionItemListFragmentToItemDetailFragment(it.id) this .findNavController().navigate(action) }
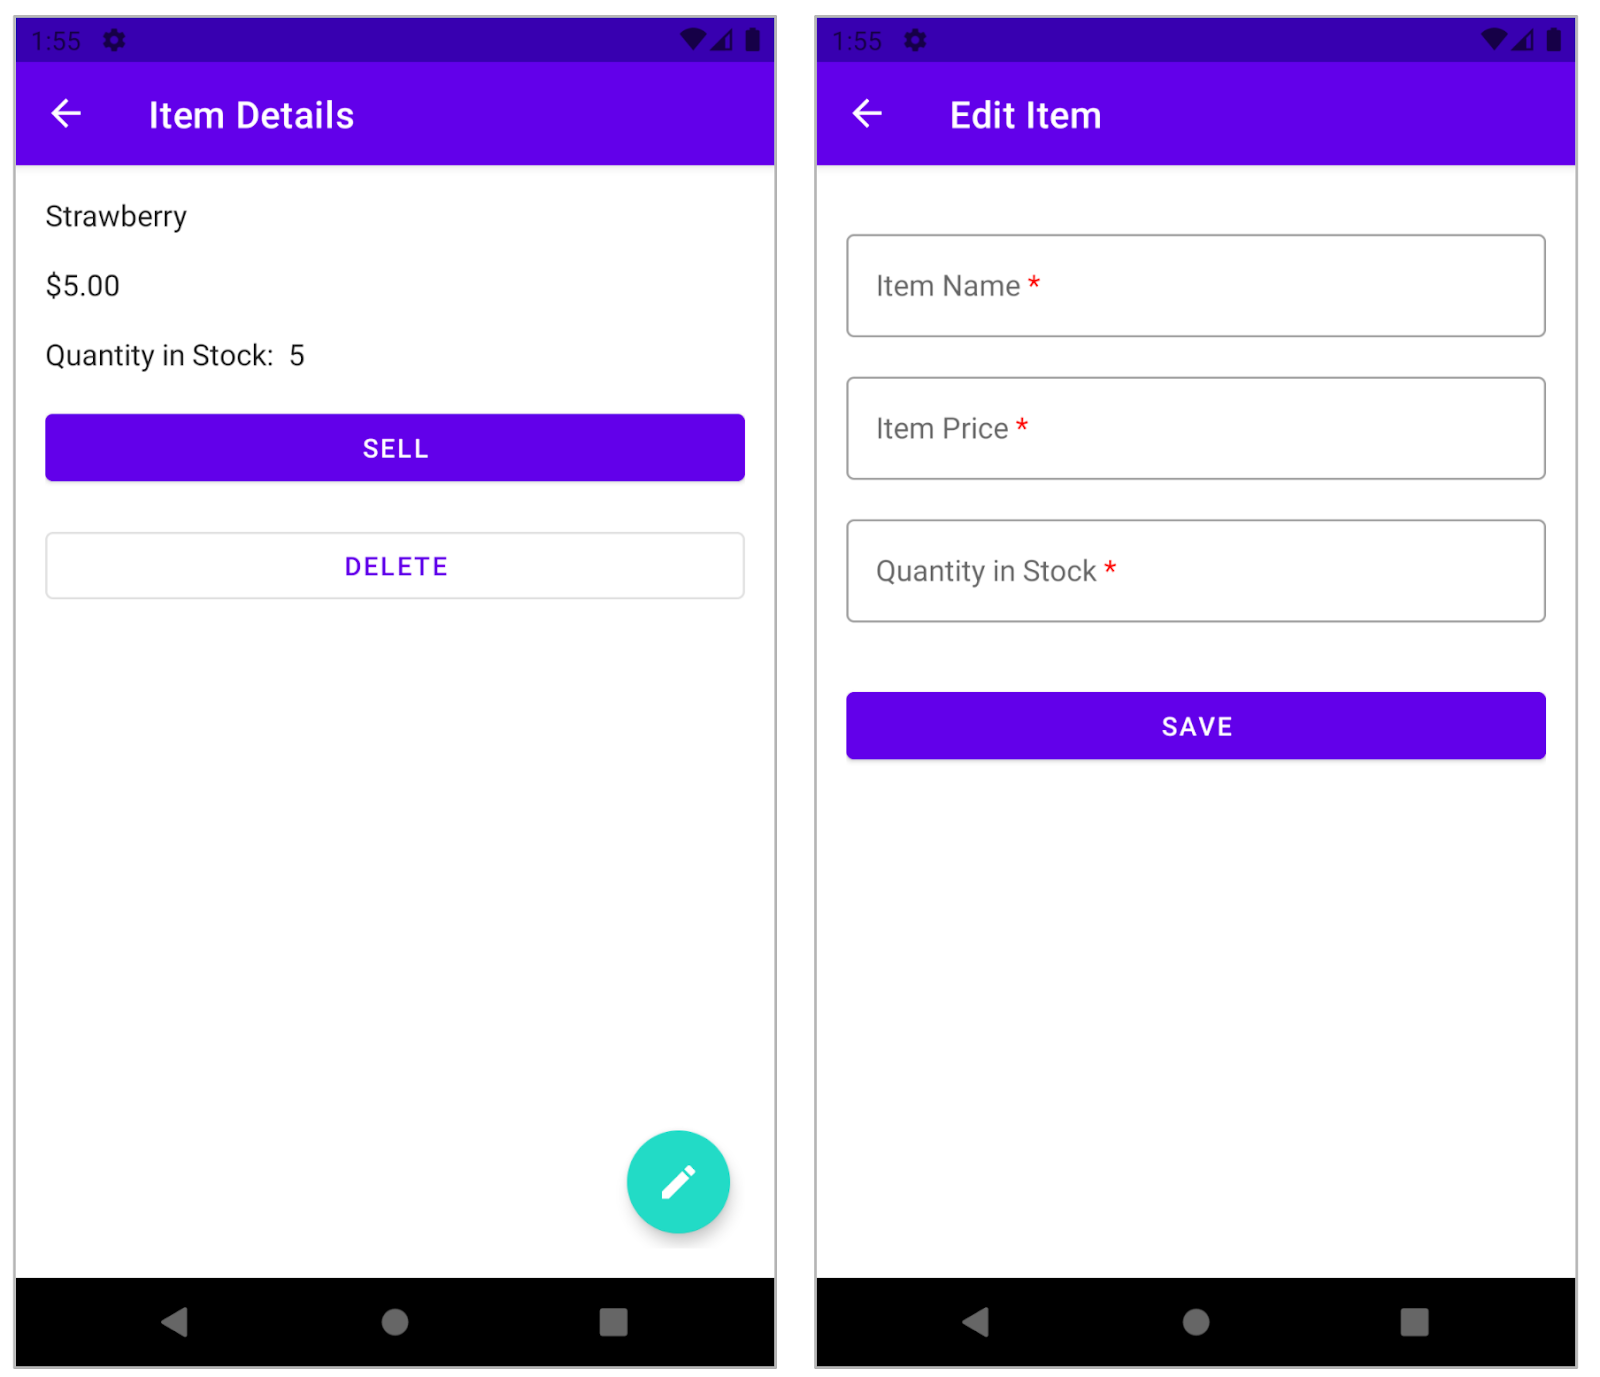
執行 app。在 RecyclerView 中按一下某個 item。App 將轉至「Item Details」畫面。請注意,details 為空白(blank)。輕觸 buttons,系統沒有回應。
在接下來的步驟中,您要在「Item Details」畫面中顯示 entity details,並為「Sell」和「Delete」button 新增功能。
擷取 item details 在這個步驟中,您將在 InventoryViewModel 中新增 function,以根據 item id 從 database 中擷取 item details entity details 。
在 InventoryViewModel 中,新增名為 retrieveItem() 的 function,該 function 會以 Int 做為 item id,並 return LiveData<Item>。您很快便要修正 return 運算式錯誤。
1
2
fun retrieveItem (id: Int ) }
在新 function 中,對 itemDao 呼叫 getItem(),並傳入參數 id。getItem() function 會 return Flow。如要將 Flow value 做為 LiveData 使用,請呼叫 asLiveData() function,並將此 function 做為 retrieveItem() function 的 return。已完成的 function 應如下所示:
1
2
3
fun retrieveItem (id: Int ) return itemDao.getItem(id).asLiveData() }
將 data bind 至 TextView 在這個步驟中,您將在 ItemDetailFragment 中建立 ViewModel instance ,並將 ViewModel dataTextViewobserver 附加至 ViewModel 中的 data更新畫面上的 inventory list 。
在 ItemDetailFragment 中,新增 type Item entity 的 item 可變動屬性( var )。這個屬性可用來儲存單一 entity 的相關資訊 。這個屬性稍後會初始化,請在前面加上 lateinit。
import com.example.inventory.data.Item
請於 class ItemDetailFragment 開頭宣告一個 type 為 InventoryViewModel 的 private 不可變屬性 viewModel。使用 by 委派,將屬性初始化作業傳送至 activityViewModels class。傳入 InventoryViewModelFactory constructor。
1
2
3
4
5
private val viewModel: InventoryViewModel by activityViewModels { InventoryViewModelFactory( (activity?.application as InventoryApplication).database.itemDao() ) }
import androidx.fragment.app.activityViewModels。
同樣在 ItemDetailFragment 中,建立名為 bind() 的 private function,該 function 會採用 Item entity 的 instance 做為參數,並且不會 return 任何內容。
1
2
private fun bind (item: Item ) }
實作 bind() function,這與您在 ItemListAdapter 中所進行的操作類似。將 itemName TextView 的 text 屬性設為 item.itemName。對 item 屬性呼叫 getFormattedPrice(),以設定 price value 的格式(format),然後將其設為 itemPrice TextView 的 text 屬性。將 quantityInStock 轉換為 String,並將其設為 itemQuantity TextView 的 text 屬性。
1
2
3
4
5
private fun bind (item: Item ) binding.itemName.text = item.itemName binding.itemPrice.text = item.getFormattedPrice() binding.itemCount.text = item.quantityInStock.toString() }
更新 bind() function,以對程式碼區塊使用 apply{} scope function,如下所示。
1
2
3
4
5
6
7
private fun bind (item: Item ) binding.apply { itemName.text = item.itemName itemPrice.text = item.getFormattedPrice() itemCount.text = item.quantityInStock.toString() } }
還是在 ItemDetailFragment 中,覆寫 onViewCreated()。
1
2
3
override fun onViewCreated (view: View , savedInstanceState: Bundle ?) super .onViewCreated(view, savedInstanceState) }
在之前某個步驟中,您已從 ItemListFragment 將 item id 做為 navigation 引數傳遞至 ItemDetailFragment 在 onViewCreated() 中的 super function 呼叫下方,建立名為 id 的不可變變數( val )。擷取 navigation 引數並將其指派給這個新的變數。
1 val id = navigationArgs.itemId
接著,請使用這個 id 變數來擷取 item details 。同樣在 onViewCreated() 中,對傳入 id 的 viewModel 呼叫 retrieveItem() function。將 observer 附加至傳入 viewLifecycleOwner 和 lambda 的 return value。
1 2 viewModel.retrieveItem(id).observe(this .viewLifecycleOwner) { }
在 lambda 中,傳入 selectedItem 做為參數,其中包含擷取自 database 的 Item entity。在 lambda function 內文中,將 selectedItem value 指派給 item。呼叫傳入 item 的 bind() function。已完成的 function 應如下所示。
1
2
3
4
5
6
7
8
override fun onViewCreated (view: View , savedInstanceState: Bundle ?) super .onViewCreated(view, savedInstanceState) val id = navigationArgs.itemId viewModel.retrieveItem(id).observe(this .viewLifecycleOwner) { selectedItem -> item = selectedItem bind(item) } }
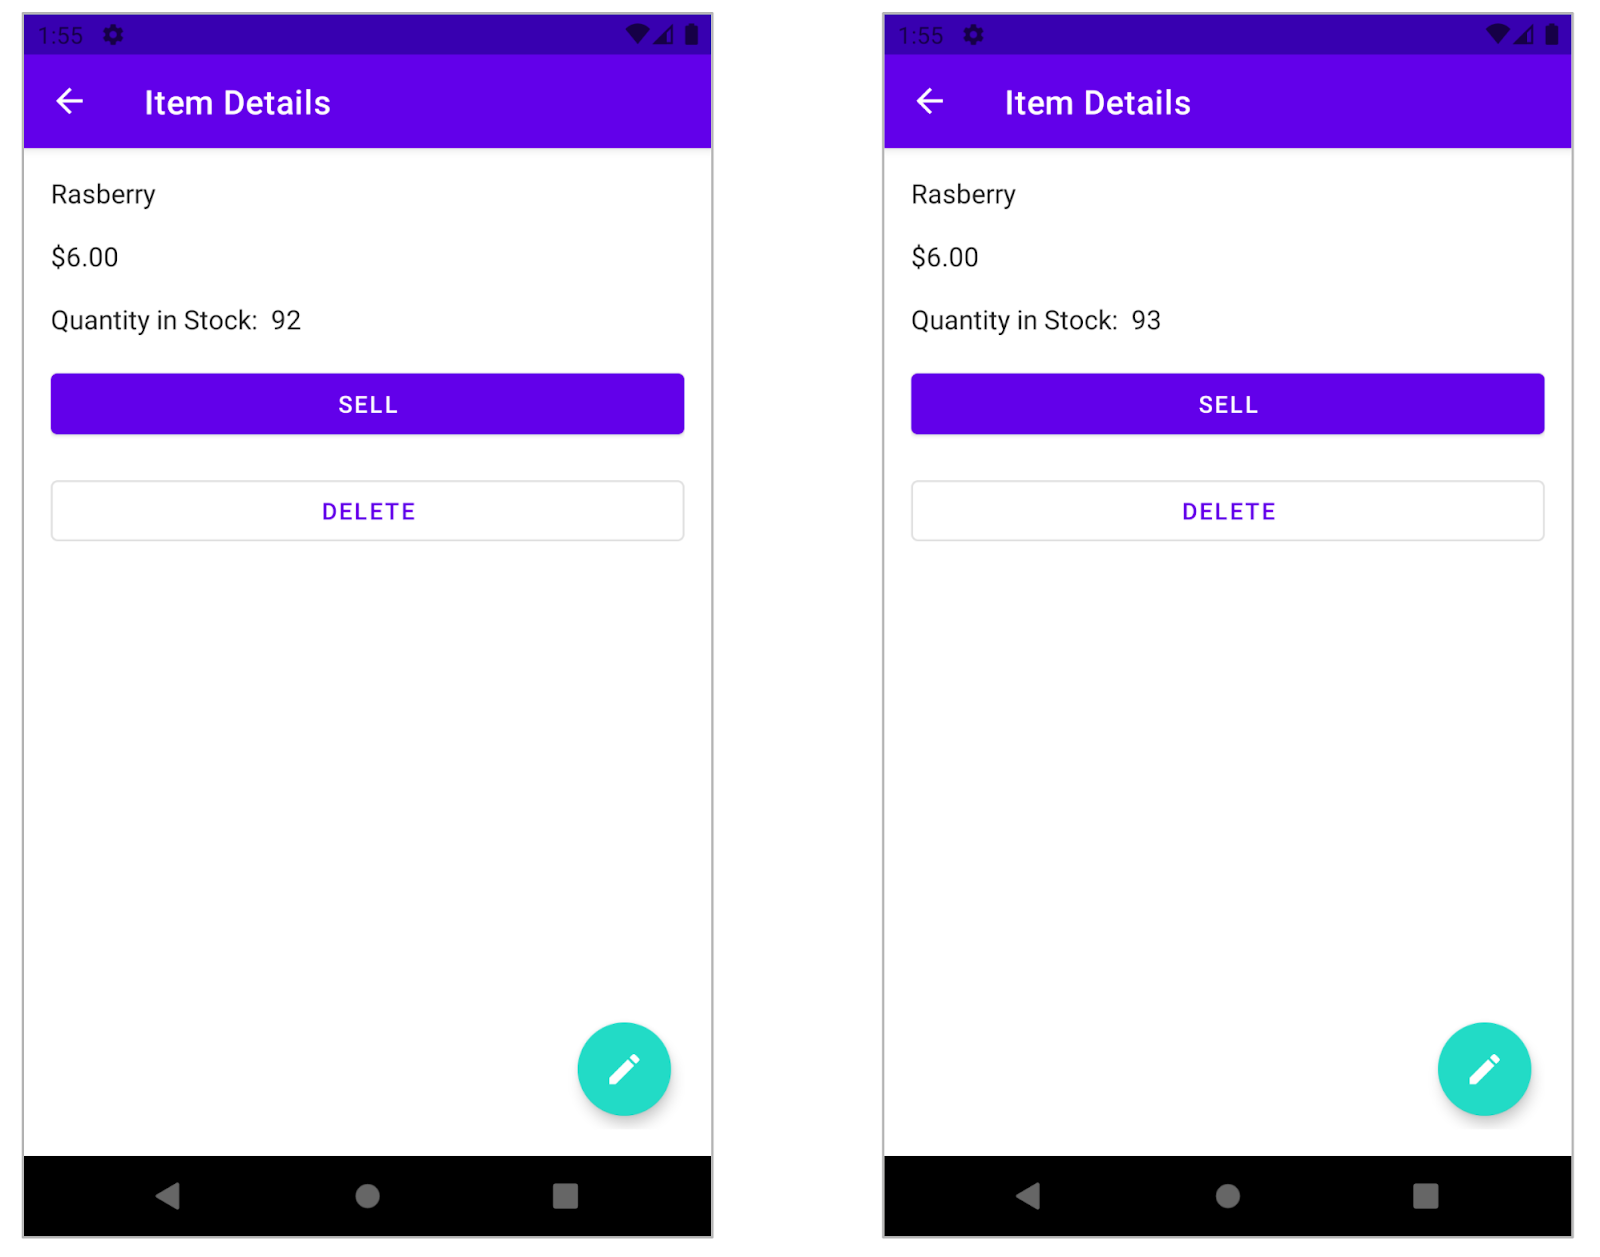
執行 app。按一下「Inventory」畫面上的任何 list 元素,系統會隨即顯示「Item Details」畫面。請注意,現在畫面不再為空白(blank),而是顯示擷取自 inventory database 的 entity details。
依序輕觸「Sell」button、「Delete」button 和 FAB button。沒有回應!接下來的工作中,您將實作這些 button 的功能。
實作 sell item 在這項工作中,您要擴充 app 功能,並實作 sell 功能 。
以下是這個步驟的詳細操作說明:
在 ViewModel 中新增函式以更新 entity 。
建立一個新方法,用於減少數量 ,同時更新 app database 中的 entity 。
將 click listener 附加到 Sell button。
如果數量為 0,請停用 Sell button。
在 InventoryViewModel 中,新增名為 updateItem() 的 private 函式,該函式會使用 entity class Item 的 instance 且不會 return 任何內容。
1
2
private fun updateItem (item: Item ) }
實作新方法:updateItem()。如要從 ItemDao class 呼叫 update() suspend 方法,請使用 viewModelScope 啟動 coroutine 。在 launch 區塊中,對傳入 item 的 itemDao 呼叫 update() 函式。已完成的方法應如下所示。
1
2
3
4
5
private fun updateItem (item: Item ) viewModelScope.launch { itemDao.update(item) } }
在 InventoryViewModel 中,新增其他名為 sellItem() 的方法,該方法會使用 Item entity class 的 instance,且不會 return 任何內容。
1
2
fun sellItem (item: Item ) }
在 sellItem() 函式中,新增 if 條件來檢查 item.quantityInStock 是否大於 0。
1
2
3
4
fun sellItem (item: Item ) if (item.quantityInStock > 0 ) { } }
在 if 區塊內,您需要使用 data class 的 copy()更新 entity 。
Data class:copy() 根據預設,系統會向 data class 的所有 instance 提供 copy()複製物件來變更其部分屬性 ,但保留其餘屬性。
舉例來說,考慮如下所示的 User class 及其 instance jack。如要建立新的 instance 且僅更新 age 屬性,則實作方法如下:
1 2 3 4 5 6 7 8 data class User (val name: String = "" , val age: Int = 0 )val jack = User(name = "Jack" , age = 1 )val olderJack = jack.copy(age = 2 )
返回 InventoryViewModel 中的 sellItem() 函式。在 if 區塊中,建立名為 newItem 的新不可變屬性( val )。在傳入更新的 quantityInStock 的 item instance 上呼叫 copy() 函式,藉此減少 1 庫存。
1 val newItem = item.copy(quantityInStock = item.quantityInStock - 1 )
在 newItem 定義下方,呼叫傳入新的更新 entity (即 newItem) 的 updateItem() 函式。已完成的方法應如下所示。
1
2
3
4
5
6
7
fun sellItem (item: Item ) if (item.quantityInStock > 0 ) { val newItem = item.copy(quantityInStock = item.quantityInStock - 1 ) updateItem(newItem) } }
如要新增銷售庫存(selling stock) 功能,請前往 ItemDetailFragment。捲動至 bind() 函式的結尾。在 apply 區塊內,為 Sell button 設定 click listener ,並在 viewModel 上呼叫 sellItem() 函式。
1
2
3
4
5
6
7
private fun bind (item: Item ) binding.apply { ... sellItem.setOnClickListener { viewModel.sellItem(item) } } }
執行 app。在「Inventory」畫面中,按一下數量大於 0 的 list 元素。系統隨即顯示「Item Details」畫面。輕觸 Sell button。請注意數量值會減少一個單位。
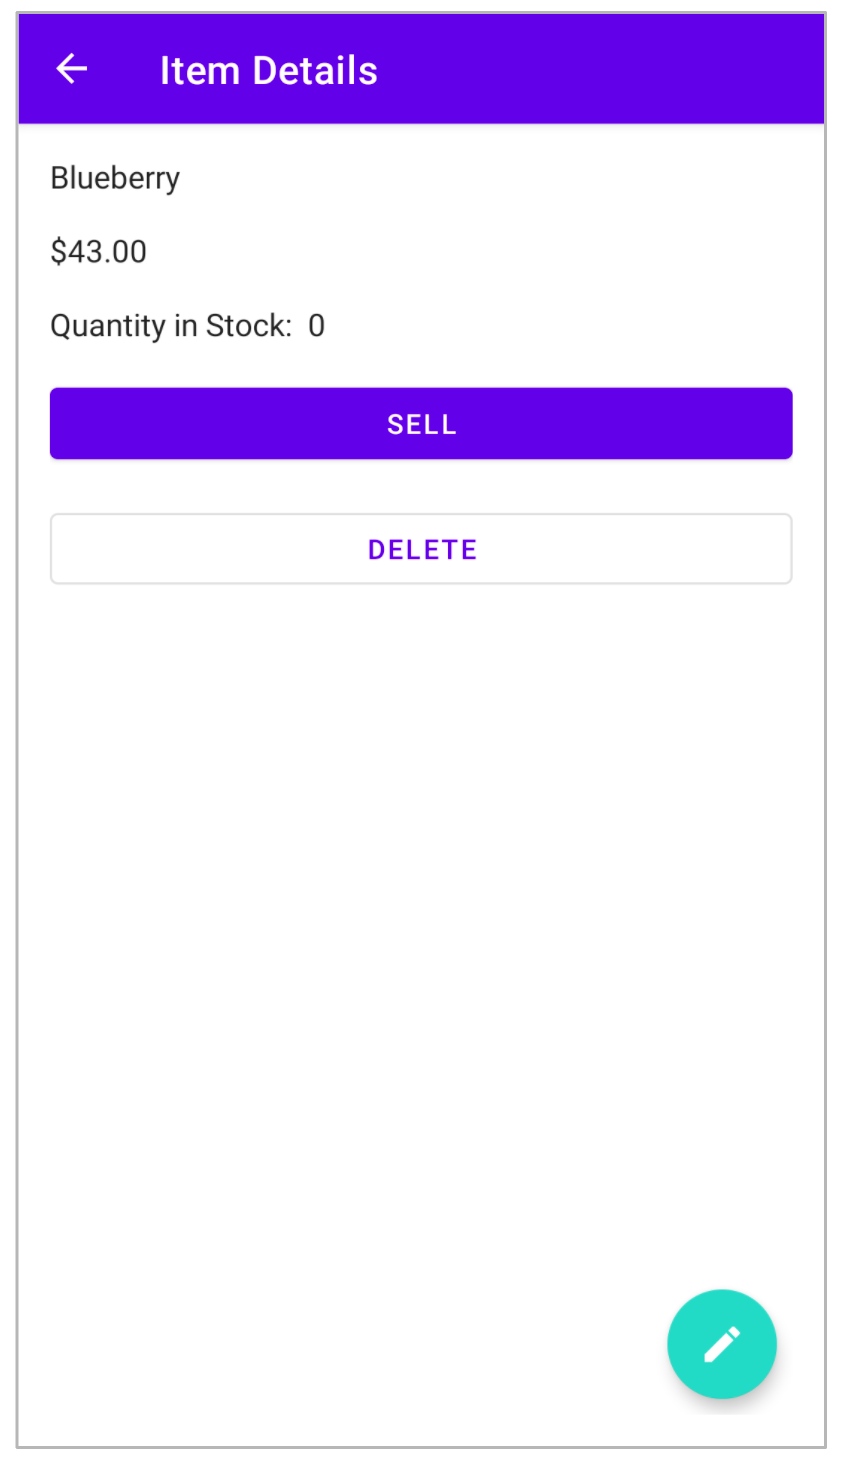
在「Item Details」畫面上,連續輕觸 Sell button 即可將數量設為 0。數量設為 0 後,輕觸 Sell button。不會出現明顯的變更。這是因為函式 sellItem() 會先檢查數量是否大於 0,然後再更新數量。
如要為使用者提供更符合需求的意見回饋,建議您在沒有 item 可銷售時停用 Sell button。在 InventoryViewModel 中,新增函式,檢查數量是否大於 0。將函式命名為 isStockAvailable(),該函式使用 Item instance 並傳回 Boolean。
1
2
3
fun isStockAvailable (item: Item ) Boolean { return (item.quantityInStock > 0 ) }
前往 ItemDetailFragment,捲動至 bind() 函式。在 apply 區塊中,在傳入 item 的 viewModel 上呼叫 isStockAvailable() 函式。請將 return 的 value 設為 Sell button 的 isEnabled 屬性。程式碼應如下所示。
1
2
3
4
5
6
7
private fun bind (item: Item ) binding.apply { ... sellItem.isEnabled = viewModel.isStockAvailable(item) sellItem.setOnClickListener { viewModel.sellItem(item) } } }
執行 app,請注意,當庫存數量為 0 時,系統將停用 Sell button。恭喜您在 app 中實作了 sell item 功能。
Delete item entity 與上一項工作一樣,您將實作刪除(delete)功能,進一步擴充 app 的功能。
以下是這個步驟的詳細操作說明:
在 ViewModel 中新增函式,以從 database 中刪除 entity 。
在 ItemDetailFragment 中新增方法,以呼叫新的 delete 函式並處理 navigation。
將 click listener 附加到 Delete button。
在 InventoryViewModel 中,新增名為 deleteItem() 的函式,該函式會使用名為 item 的 Item entity class 的 instance,但不會 return 任何內容。在 deleteItem() 函式中,使用 viewModelScope 啟動 coroutine。在 launch 區塊內,對傳入 item 的 itemDao 呼叫 delete() 方法。
1
2
3
4
5
fun deleteItem (item: Item ) viewModelScope.launch { itemDao.delete(item) } }
在 ItemDetailFragment 中,捲動至 deleteItem() 函式的開頭。對 viewModel 呼叫 deleteItem(),並傳入 item。item instance 會包含目前顯示在「Item Details」畫面上的 entity。已完成的方法應如下所示。
1
2
3
4
private fun deleteItem () viewModel.deleteItem(item) findNavController().navigateUp() }
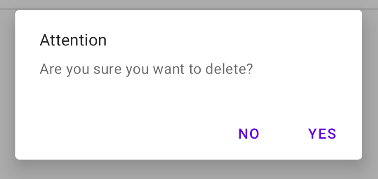
在 ItemDetailFragment 中,捲動至 showConfirmationDialog() 函式。這個函式會在範例程式碼中提供給您。這個方法會顯示 alert dialog,以便在刪除 item 前取得使用者的確認,並在使用者輕觸 positive button 時呼叫 deleteItem() 函式。
1
2
3
4
5
6
7
8
private fun showConfirmationDialog () MaterialAlertDialogBuilder(requireContext()) ... .setPositiveButton(getString(R.string.yes)) { _, _ -> deleteItem() } .show() }
showConfirmationDialog() 函式會顯示 alert dialog,如下所示:
在 ItemDetailFragment 中,請在 bind() 函式結尾的 apply 區塊內,將設定 Delete button 的 click listener。呼叫 click listener lambda 中的 showConfirmationDialog()。
1
2
3
4
5
6
private fun bind (item: Item ) binding.apply { ... deleteItem.setOnClickListener { showConfirmationDialog() } } }
執行 app!在「Inventory」list 畫面中選取 list 元素,然後在「Item Details」畫面中輕觸「Delete」button。輕觸「Yes」,app 將返回「Inventory」畫面。請注意,已刪除的 entity 已不在 app database 中。恭喜您實作了 delete 功能。
Edit item entity 與先前的工作類似,在這項工作中,您要在 app 中新增另一項功能,實作 edit item entity 。
以下為編輯 app database 中 entity 的步驟:
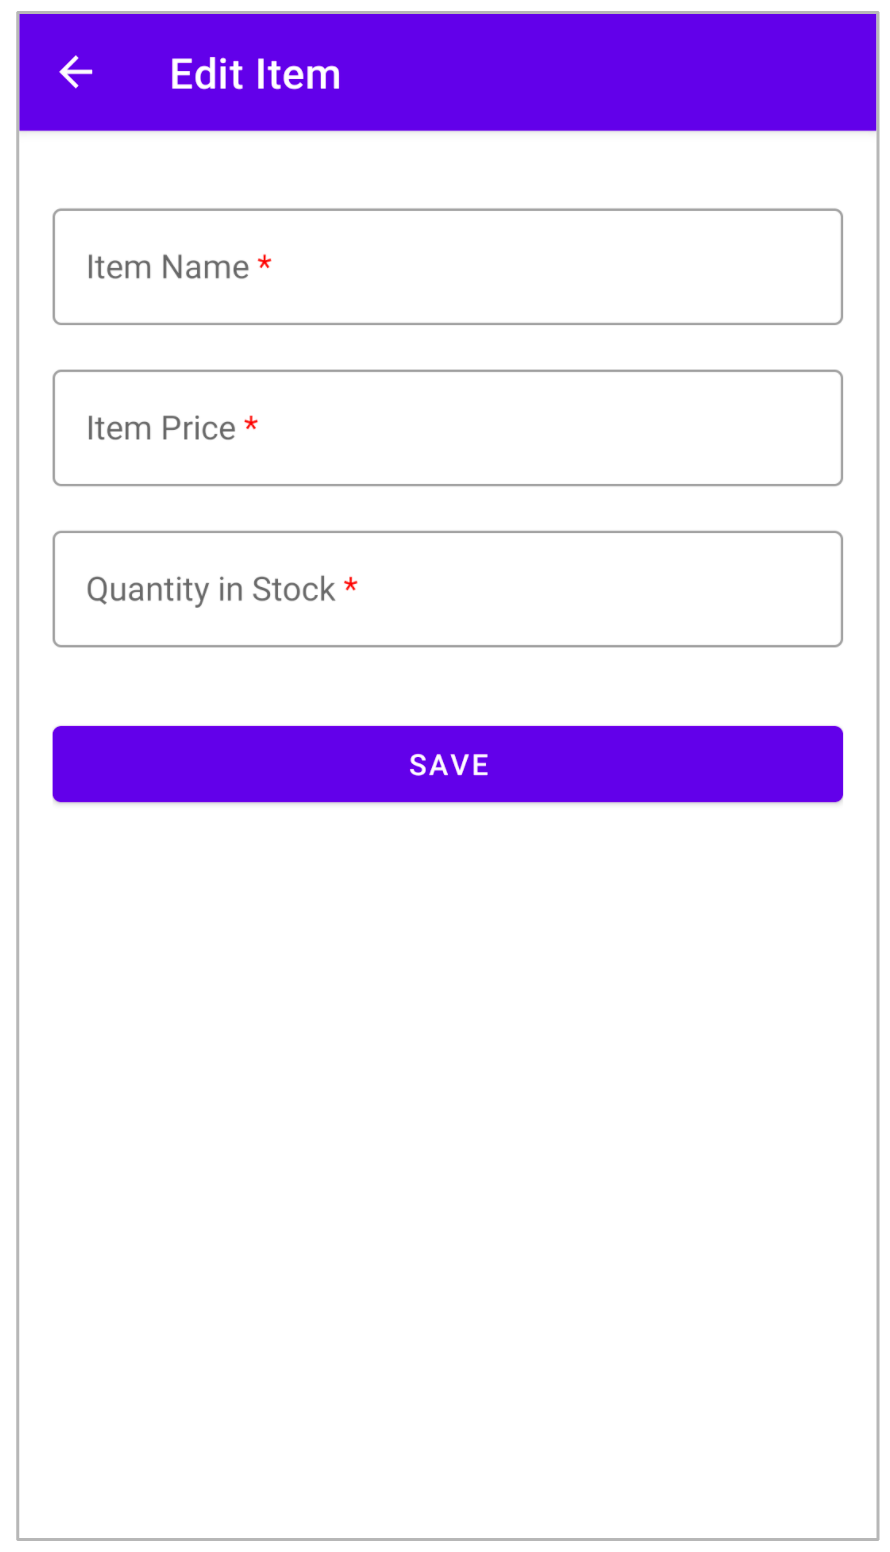
將 fragment title 更新為「Edit Item」,藉此重複使用「Add Item」畫面。
將 click listener 新增至 FAB button,前往「Edit Item」畫面。
為 TextView 填入 entity details 。
使用 Room 更新 database 中的 entity。
在 ItemDetailFragment 中,新增名為 editItem() 的 private 函式,該函式不採用任何參數,且不會 return 任何內容。在下一個步驟中,請將畫面標題更新為「Edit Item」,這樣就能重複使用 fragment_add_item.xml。為實作此操作,您需要傳送 fragment title string 以及 item id 。
1
2
private fun editItem () }
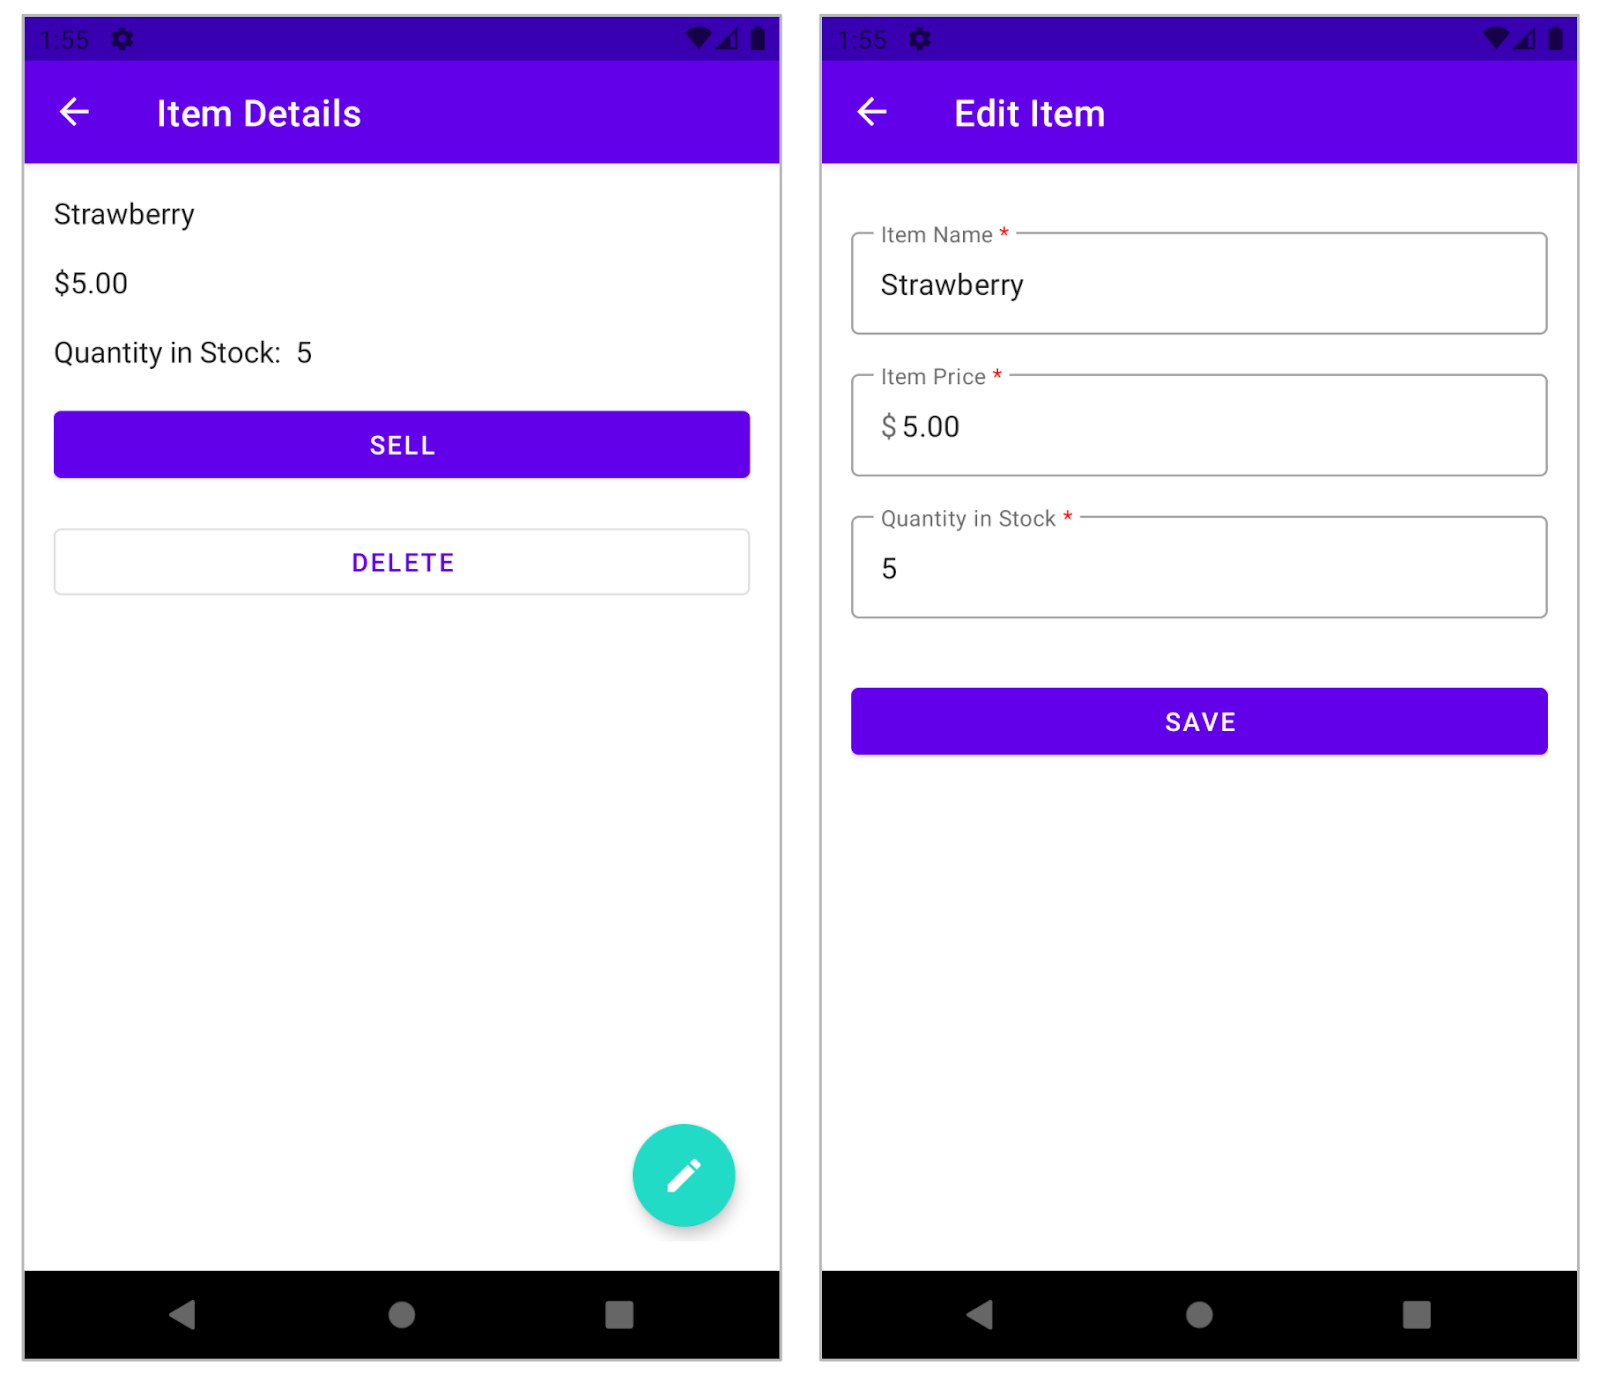
更新 fragment title 後,「Edit Item」畫面應顯示如下。
在 editItem() 函式中,建立名為 action 的不可變變數( val )。對傳入 title string edit_fragment_title 和 item id 的 ItemDetailFragmentDirections 呼叫 actionItemDetailFragmentToAddItemFragment()。將 return 的 value 指派給 action。在 action 定義下方,呼叫 this.findNavController().navigate() 並傳入 action,前往「Edit Item」畫面。
1
2
3
4
5
6
7
private fun editItem () val action = ItemDetailFragmentDirections.actionItemDetailFragmentToAddItemFragment( getString(R.string.edit_fragment_title), item.id ) this .findNavController().navigate(action) }
還是在 ItemDetailFragment 中,捲動至 bind() 函式。在 apply 區塊內,為 FAB button 設定 click listener ,以及從 lambda 呼叫 editItem() 函式,以便前往「Edit Item」畫面。
1
2
3
4
5
6
private fun bind (item: Item ) binding.apply { ... editItem.setOnClickListener { editItem() } } }
執行 app。前往「Item Details」畫面。按一下 FAB button。請注意,螢幕 title 已更新為「Edit Item」,但所有 text fields 均為空白(empty) 。在下一個步驟中,您將修正這個問題。
填入 TextView 在這個步驟中,您要在「Edit Item」螢幕的 text fields 中填入 entity details 。由於我們使用的是 Add Item 螢幕,因此您要在 Kotlin 檔案 AddItemFragment.kt 中新增函式。
在 AddItemFragment 中,新增 private 函式,將 text fields 與 entity details bind 在一起 。為函式 bind() 命名,該函式會使用商品 entity class 的 instance,且不會 return 任何內容。
1
2
private fun bind (item: Item ) }
bind() 函式的實作方式與先前在 ItemDetailFragment 中的實作類似。在 bind() 函式中,使用 format() 函式將 price 四捨五入至小數點後兩位,並指派給名為 price 的 val,如下所示。
1 val price = "%.2f" .format(item.itemPrice)
在 price 定義下方,針對 binding 屬性使用 apply scope function,如下所示。
在 apply scope function 程式碼區塊內,將 item.itemName 設為 itemName 的 text 屬性。使用 setText() 函式,並傳入 item.itemName string 和 TextView.BufferType.SPANNABLE 做為 BufferType。
1 2 3 binding.apply { itemName.setText(item.itemName, TextView.BufferType.SPANNABLE) }
類似於上述步驟,設定 price EditText 的 text 屬性,如下所示。如要設定 EditEdit 數量的 text 屬性,請記得將 item.quantityInStock 轉換為 String。您完成的函式應如下所示。
1 2 3 4 5 6 7 8 private fun bind (item: Item ) val price = "%.2f" .format(item.itemPrice) binding.apply { itemName.setText(item.itemName, TextView.BufferType.SPANNABLE) itemPrice.setText(price, TextView.BufferType.SPANNABLE) itemCount.setText(item.quantityInStock.toString(), TextView.BufferType.SPANNABLE) } }
在 AddItemFragment 中,捲動至 onViewCreated() 函式。在呼叫 super class 函式之後。建立名為 id 的 val,並從 navigation 引數擷取 itemId。
1 val id = navigationArgs.itemId
新增帶有條件的 if-else 區塊,以檢查 id 是否大於零,並將 Save button 的 click listener 移至 else 區塊。在 if 區塊內,使用 id 擷取 entity,然後在其中新增 observer。在 observer 內部,更新 item 屬性並呼叫傳入 item 的 bind()。系統會提供完整函式供您複製貼上。這個函式簡單易懂,您可以自行研究。
1 2 3 4 5 6 7 8 9 10 11 12 13 14 override fun onViewCreated (view: View , savedInstanceState: Bundle ?) super .onViewCreated(view, savedInstanceState) val id = navigationArgs.itemId if (id > 0 ) { viewModel.retrieveItem(id).observe(this .viewLifecycleOwner) { selectedItem -> item = selectedItem bind(item) } } else { binding.saveAction.setOnClickListener { addNewItem() } } }
執行 app,前往「Item Details」,然後輕觸「+」這個 FAB button。請注意,這些欄位會填入 item details。編輯 stock quantity 或任何其他欄位,然後輕觸 Save button。沒有回應!這是因為您並未更新 app database 中的 entity 。您很快就會解決這個問題。
使用 Room 更新 entity 在最後一項工作中,新增最後一段程式碼來實作更新功能。您要在 ViewModel 中定義必要的函式,並在 AddItemFragment 中使用它們。
在 InventoryViewModel 中,新增名為 getUpdatedItemEntry() 的 private 函式,該函式使用 Int,以及 entity details 三個名為 itemName、itemPrice 和 itemCount 的 string。Return 函式的 Item instance。程式碼僅供參考。
1
2
3
4
5
6
7
private fun getUpdatedItemEntry ( itemId: Int , itemName: String , itemPrice: String , itemCount: String ) }
在 getUpdatedItemEntry() 函式中,使用函式參數建立 item instance,如下所示。Return 函式的 Item instance。
1
2
3
4
5
6
7
8
9
10
11
12
13
private fun getUpdatedItemEntry ( itemId: Int , itemName: String , itemPrice: String , itemCount: String ) return Item( id = itemId, itemName = itemName, itemPrice = itemPrice.toDouble(), quantityInStock = itemCount.toInt() ) }
同樣在 InventoryViewModel 中,新增其他名為 updateItem() 的函式。此函式也會使用 Int 和 entity details 的三個 strung,且不會 return 任何內容。使用以下程式碼片段中的變數名稱。
1
2
3
4
5
6
7
fun updateItem ( itemId: Int , itemName: String , itemPrice: String , itemCount: String ) }
在 updateItem() 函式中,呼叫傳入 entity 資訊的 getUpdatedItemEntry() 函式,該函式會以函式參數的形式傳遞,如下所示。將 return 的 value 指派給名為 updatedItem 的不可變變數( val )。
1 val updatedItem = getUpdatedItemEntry(itemId, itemName, itemPrice, itemCount)
在 getUpdatedItemEntry() 函式呼叫的正下方,呼叫傳入 val updatedItem 的 updateItem(item: Item) 函式。已完成的函式如下所示:
1
2
3
4
5
6
7
8
9
10
11
fun updateItem ( itemId: Int , itemName: String , itemPrice: String , itemCount: String ) val updatedItem = getUpdatedItemEntry(itemId, itemName, itemPrice, itemCount) updateItem(updatedItem) }
返回 AddItemFragment,新增名為 updateItem() 的 private 函式,該函式不含任何參數,且不會 return 任何內容。在函式中,新增 if 條件,以透過呼叫函式 isEntryValid() 來驗證使用者輸入內容。
1
2
3
4
private fun updateItem () if (isEntryValid()) { } }
在 if 區塊中,呼叫傳遞 entity details 的 viewModel.updateItem()。請使用 navigation 引數中的 itemId,以及 EditText 中的其他 entity details,例如 name、price 和 quantity,如下所示。
1
2
3
4
5
6
viewModel.updateItem( this .navigationArgs.itemId, this .binding.itemName.text.toString(), this .binding.itemPrice.text.toString(), this .binding.itemCount.text.toString() )
在 updateItem() 函式呼叫下方,定義名為 action 的 val。對 AddItemFragmentDirections 呼叫 actionAddItemFragmentToItemListFragment(),並將 return 的 value 指派給 action。請瀏覽(navigate)至 ItemListFragment,並呼叫傳入 action 的 findNavController().navigate()。
1
2
3
4
5
6
7
8
9
10
11
12
private fun updateItem () if (isEntryValid()) { viewModel.updateItem( this .navigationArgs.itemId, this .binding.itemName.text.toString(), this .binding.itemPrice.text.toString(), this .binding.itemCount.text.toString() ) val action = AddItemFragmentDirections.actionAddItemFragmentToItemListFragment() findNavController().navigate(action) } }
還是在 AddItemFragment 中,捲動至 bind() 函式。在 binding.apply scope functino 區塊中,為 Save button 設定 click listener 。呼叫 lambda 中的 updateItem() 函式,如下所示。
1
2
3
4
5
6
7
private fun bind (item: Item ) ... binding.apply { ... saveAction.setOnClickListener { updateItem() } } }
執行 app!嘗試編輯 inventory items;您應該可以編輯 inventory app database 中的任何 item。
App 執行結果 完成的 app 如下: